What is the Mechanism Behind 3D Printing?
The ISO/ASTM 52900, which covers the basic principles and terms used in additive manufacturing, classifies 3D printing methods into seven different groups. Each of these 3D printing techniques operates in its unique way.
The speed of crafting a 3D creation varies based on factors like the printing method, the size of the final product, the material chosen, the level of quality you’re aiming for, and how you’ve set up the process. Depending on these factors, the time it takes to complete a 3D print can range from just a few minutes to a couple of days.
Let’s explore the various flavors of 3D printing, including:
Powder bed fusion:
In the world of powder bed fusion (PBF), we use the power of heat, delivered through an electron beam or laser, to carefully meld targeted sections of a powder bed, layer by layer. These layers come together, stacking up until a complete part is formed.
PBF whether it involves sintering or melting processes, the main way things get done stays consistent. Initially, a recoating roller or blade delicately spreads a thin layer of powder on the build platform. After that, a heat source scans the surface of the powder bed, skillfully raising the temperature of particles to bind specific areas.
After scanning a cross-section or layer with the heat source, the platform lowers, allowing the same process to be carried out for the next layer. The result is a volume featuring fused components, while the surrounding powder remains untouched. Following completion, the platform rises, making it easy to retrieve the finished build. Powder bed fusion encompasses various common printing techniques, including selective laser sintering (SLS) and direct metal laser sintering (DMLS).
People often use SLS to produce polymer parts for prototypes and functional components. In SLS printing, the powder bed serves as the only support structure, enabling the fabrication of intricate geometries. Despite this advantage, the resulting parts may exhibit inner porosity and a slightly grainy surface, typically necessitating post-processing.
Just like how SLS operates, selective laser melting (SLM), electron beam powder bed fusion (EBPBF), and direct metal laser sintering (DMLS) are also methods employed to craft metal components. They share the common approach of utilizing a laser to fuse powder particles, building up the structure layer by layer.
In DMLS, the particles’ temperature rises just enough to trigger fusion, allowing them to bond at a molecular level. In contrast, SLM goes all-in, completely melting those metal particles. These methods bring the heat, so brace yourself for support structures. After the magic happens, it’s either a dance with CNC machining or a manual tango to bid those support structures farewell. Finally, our parts get a spa day with thermal treatment to zen out any lingering stress from the post-processing party.
Using advanced metal 3D printing methods produces parts with exceptional physical attributes, sometimes surpassing the durability of the original metal. The surface quality is consistently impressive. When it comes to materials, these methods excel in handling challenging metal superalloys and ceramics that might pose difficulties in alternative processes. Nevertheless, it’s worth noting that both DMLS and SLM can be on the pricier side, and the size limitations of the system impact the maximum output size.
VAT photopolymerization
Breaking down VAT photopolymerization, we can look at two main approaches: digital light processing (DLP) and stereolithography (SLA). In these methods, each component is meticulously crafted layer by layer, as a light source selectively solidifies liquid material (typically resin) held in a vat.
In the world of 3D printing, DLP operates by projecting a full-layer image onto the liquid surface in the tank, while SLA depends on a single-point UV source or laser to solidify the liquid. After printing, you’ll need to tidy up any extra resin, and then the finished item requires exposure to light for added strength. Any support structures can be taken off during post-processing, and if you desire a polished finish, additional steps can be taken to enhance the overall quality.
If you’re aiming for top-notch dimensional precision in your output and crave intricate details with a flawless finish, DLP and SLA methods are your go-to choices. That’s why these techniques shine when it comes to crafting prototypes with the utmost finesse.
Nevertheless, the results from these techniques tend to be delicate, making them not the best choice for creating functional prototypes. Additionally, the color and mechanical characteristics of these components are prone to deterioration under the sun’s UV light, rendering them unsuitable for outdoor applications. Lastly, the need for support structures is common, and they might leave imperfections that can be addressed through post-processing.
Binder jetting
In the fascinating process of binder jetting, a thin layer of powdered magic—whether it’s polymer sand, ceramic, or metal—is delicately laid down on the building stage. Then, like a skilled artist, a print head swoops in, gracefully placing adhesive drops to weave these particles together. Layer by layer, a masterpiece is born.
To achieve optimal results, it’s essential to thermally sinter or infiltrate metal parts with a low-melting-point metal like bronze. On the other hand, ceramic or vibrant polymer components can be effectively saturated by employing a dependable cyanoacrylate adhesive. Don’t forget, that some post-processing is usually needed to polish and perfect the final product.
Binder jetting opens up a world of possibilities, from crafting extensive ceramic molds to bringing vibrant prototypes to life in full color and even delving into the realm of cutting-edge 3D printing.
Material jetting
Material jetting works much like your regular inkjet printer but with a twist. Instead of squirting ink onto paper, it employs one or more fancy print heads to carefully lay down layers of liquid material. After each layer is laid down, it gets a little TLC to solidify before the next layer gets its chance to shine. And here’s the cool part: support structures, which are like the scaffolding for your creation, can be made using a water-soluble substance that you can easily wash away once your masterpiece is done.
While this meticulous technique is perfect for crafting vibrant, multi-material components, it does come with a higher price tag, and the result may be a bit fragile and prone to degradation.
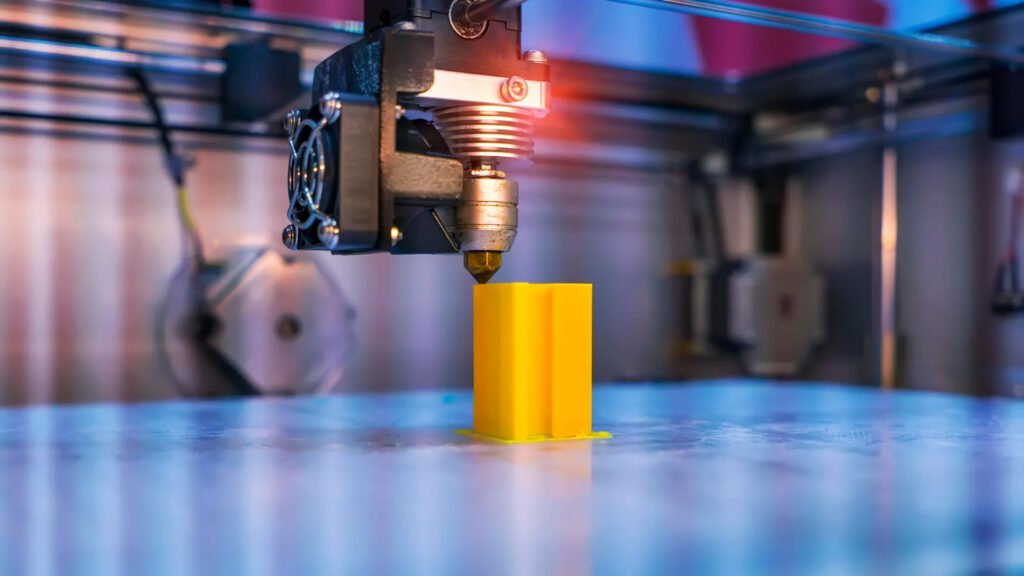
Fused deposition modeling
In the process of fused deposition modeling (FDM), a heated nozzle guides a filament spool to an extrusion head. The extrusion head warms the material, making it pliable, and then strategically deposits it in predefined areas to solidify. After each layer is formed, the build platform lowers itself, getting ready for the next layer to be applied.
In simple terms, this technique, commonly referred to as material extrusion, offers quick and budget-friendly results. Yet, it falls short in terms of precision, usually needing additional touches for a polished look. Moreover, its end product may not be the best fit for crucial tasks since it tends to be less sturdy in one specific direction, making it less reliable for certain applications.
sheet lamination
When it comes to sheet lamination, we can break it down into two cool technologies: ultrasonic additive manufacturing (UAM) and laminated object manufacturing (LOM). UAM is pretty chill, requiring low energy and not getting too hot; it brings thin metal sheets together with ultrasonic welding magic. It’s versatile, working its charm with metals like stainless steel, titanium, and aluminum. Now, on the flip side, LOM is all about layering materials and adhesives in a tag-team fashion to whip up the result.
Direct energy deposition
In this method, we employ a laser, electric arc, electron beam, or some other concentrated thermal energy to meld powder or wire feedstock as it’s carefully positioned. The magic happens side to side, forming layers that are later stacked up to craft the final part. This approach works wonders with various materials like ceramics, polymers, and metals.