
Even if you are an experienced Node.js developer or just starting your journey, there’s always waiting to be uncovered within the world of Node.js.
In this article, I’ll explore five Node.js features that can enhance your overall experience, and those are:
- Worker Threads
- Cluster Process Module
- Built-in HTTP/2 Support
- Streams API
- REPL
But before we do, let’s first explore the Single-Threaded behavior of Node.js. Getting a grasp on this fundamental aspect will help us better understand the features we’re about to explore.
Single-Threaded Node.js: A Quick Overview
Node.js is often praised for its single-threaded setup, although it’s more precise to describe it as a “single-threaded event loop.”
But why a Single-Threaded Event Loop?
In the beginning, Node.js was crafted with a focus on handling tasks heavy on input/output, such as web servers. Rather than dealing with the hassle of managing multiple threads, which can bog down with overhead and complexities like synchronizing and switching contexts, Node.js opted for a more streamlined event-driven strategy.
Node.js brings plenty of benefits and limitations to this behavior.
The advantages are okay. But what about limitations?
The main limitations that the Node.js Single-Threaded Event Loop brings are as follows,
- CPU-bound tasks can block the loop: Performing numerous calculations might cause the system to temporarily halt, impacting its ability to promptly handle other incoming requests.
- No true parallelism: Tasks are still being done one after the other, not all at once.
To overcome these limitations, Node.js implemented Worker Threads and the Cluster Module across different versions to enhance its capabilities.
These two features can truly impact your software development journey. So, let’s delve into Worker Threads and the Cluster Module in the upcoming sections to understand their incredible usefulness.
Next up, we’ll delve into three additional Node.js features ready to swoop in and save the day whenever you need them. Stay tuned!
1. Worker Threads
(https://nodesource.com/blog/worker-threads-nodejs/)
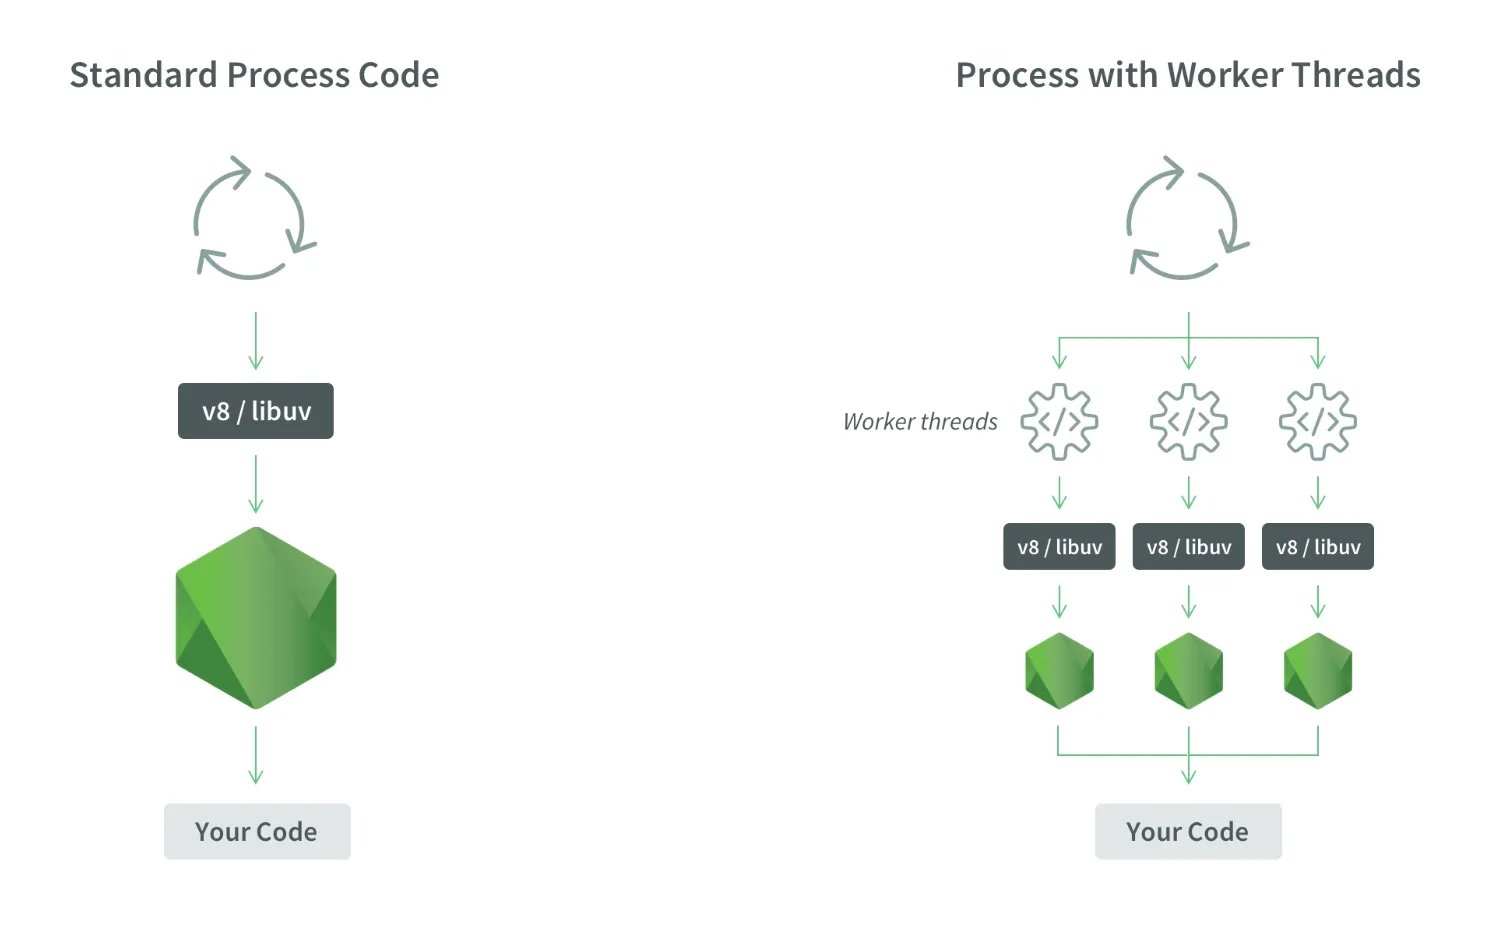
Although the single-threaded event loop in Node.js is great for handling tasks focused on input/output, the worker_threads module provides the flexibility needed to tackle CPU-intensive operations without being held back by its constraints.
Imagine a bustling kitchen where each chef is busy preparing their dish, all at the same time—that’s the magic of worker threads!
What’s happening under the hood?
Node.js, by default, is good at tackling tasks and has a single-threaded event loop that excels at handling I/O-bound tasks. But for CPU-bound tasks, it can become a bottleneck.
“Imagine worker threads as individual little pockets of JavaScript running independently within the larger framework of a Node.js application.”
Rather than burdening the main thread with all tasks, it can assign demanding computations to worker threads. This way, the main thread stays nimble, ready to manage additional tasks while the worker threads tackle the heavy lifting of complex calculations.
Essentially, worker threads allow you to:
- Offload CPU-bound tasks: Free up the main thread for other work.
- Achieve parallelism: Execute tasks concurrently for faster performance.
- Share data efficiently: Avoid the overhead of copying data between processes.
Getting started with worker threads
The worker_threads module makes it easy-peasy to create and communicate with worker threads using a simple, straightforward API:
const { Worker } = require('worker_threads');
const worker = new Worker('./worker.js', { data: { someData: 'to process' } });
worker.on('message', (message) => {
console.log(Received message from worker: ${message} );
});
worker.postMessage({ anotherData: 'to send' });
Remember, worker threads share memory. So data structures like ArrayBuffer or SharedArrayBuffer are recommended for large data exchanges to avoid unnecessary copying.
2. Cluster Process Module
(https://cheatcode.co/tutorials/how-to-add-cluster-support-to-node-js)
Although worker threads excel at handling parallel tasks, the cluster module gives you the extra boost needed to fully harness the power of your multi-core System.
Imagine a bustling restaurant with several chefs (Node.js processes) cooking different dishes at the same time, all serving hungry customers simultaneously — that’s the magic of clustering!
What’s happening under the hood?
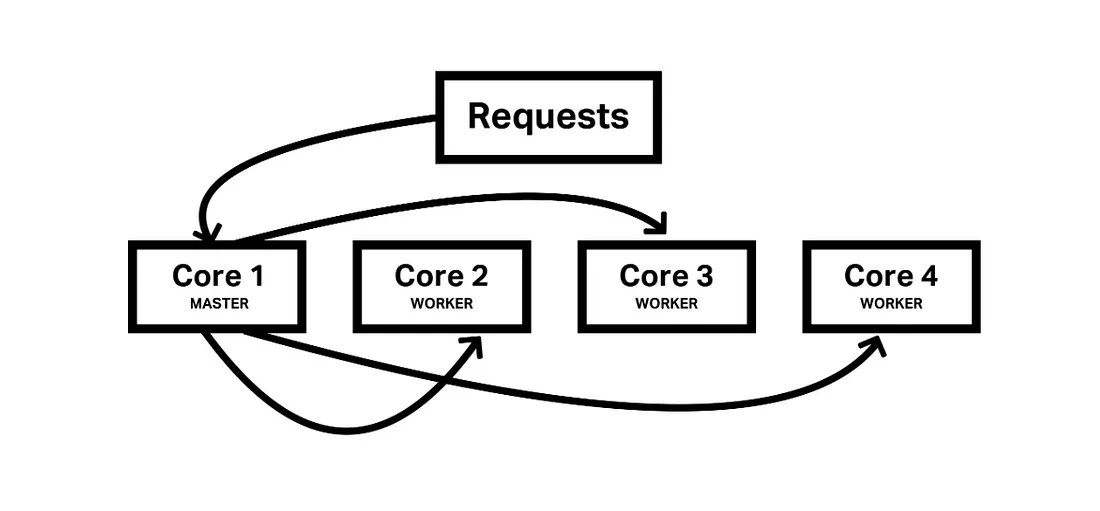
In Node.js, the Cluster Module lets you spawn several independent processes, each with its event loop and memory, boosting performance and scalability.
Each of these tasks operates on its core, making use of multiple cores to boost speed and performance, a technique known as spreading the workload (Horizontal Scaling).
This works by setting up a main process along with multiple helper processes. The main process takes care of divvying up new tasks among the helpers. Should one of the helpers hit a snag, the main process steps in to kickstart a fresh one, keeping everything running smoothly even if there are hiccups along the way.
But why embrace the Cluster?
- Boost Performance: Handle higher traffic volumes and improve response times, especially for I/O-bound tasks.
- Maximize Resource Utilization: Take advantage of all available cores in your server, significantly increasing processing power.
- Enhanced Fault Tolerance: If one worker crashes, others keep the application running, ensuring reliability and uptime.
Getting Started with the Cluster
The cluster module makes it easy-peasy to set up and handle worker processes with its simple API:
const cluster = require('cluster');
if (cluster.isMaster) {
// Master process
const numWorkers = require('os').cpus().length;
for (let i = 0; i < numWorkers; i++) {
cluster.fork();
}
cluster.on('exit', (worker, code, signal) => {
console.log(worker ${worker.process.pid} died );
});
} else {
// Worker process
// Your application logic here
app.listen(3000);
}
- Remember, when worker processes collaborate, they’re tapping into the same memory and resources, which means keeping an eye on data synchronization is key.
- Consider whether integrating the cluster module will enhance your application’s functionality enough to outweigh the added complexity it brings to your architecture.
When to Consider the Cluster:
- High-Traffic Websites: When your computer’s to-do list gets too long for one person to handle, spreading out tasks across multiple helpers with a cluster setup can make managing a huge workload a breeze.
- Long-Running Tasks: When certain tasks, such as processing images or encrypting data, take a while to complete, spreading them out among different worker processes can make things run smoother and faster for other requests.
- Fault Tolerance is Critical: In situations where it’s crucial for tasks to run smoothly, having the cluster module’s ability to bounce back from individual process hiccups is like having a reliable safety net, ensuring everything stays on track.
3. Built-in HTTP/2 Support

(https://github.com/nodejs/http2)
Although worker threads and the cluster module handle separate tasks, Node.js’s http2 module directly enhances performance by seamlessly integrating the efficient HTTP/2 protocol.
What is this HTTP/2?
HTTP/2, the successor to HTTP/1.1, brings several performance enhancements:
- Multiplexing: Allows for both sending and receiving multiple requests and responses at the same time through a single connection, getting rid of the frustrating problem where one request holds up others in HTTP/1.1.
- Header compression: By squeezing header sizes through compression, it significantly cuts down on the extra data sent, making transmissions much smoother and faster.
- Server push: This feature enables servers to anticipate what clients need before they even ask for it, which could speed up how fast web pages load for users.
How does Node.js provide support for HTTP/2?
In Node.js, you’ll find a powerful http2 module designed to handle HTTP/2 seamlessly. Let’s take a look at what it brings to the table:
- Creating HTTP/2 servers: Easily implement your favorite Node.js server patterns while unlocking extra features to effortlessly handle streams and enhance server push capabilities.
- Handling HTTP/2 clients: Tap into the features on your device to seamlessly link up with and engage with servers running on HTTP/2.
- Extensive API: Discover different ways to handle connections, streams, notifications, and errors effectively.
Getting started with http2
The Node.js documentation dives deep into the intricacies of the http2 module, offering not just links but also practical examples to truly grasp its usage. Let’s roll up our sleeves and explore some real-world scenarios together!
- Creating a basic HTTP/2 Server:
const http2 = require('http2');
const server = http2.createServer();
server.on(‘stream’, (stream, headers) => {
stream.respond({
‘status’: 200,
‘content-type’: ‘text/plain’,
});
stream.end(‘Hello from your HTTP/2 server!’);
});
server.listen(3000, () => {
console.log(‘Server listening on port 3000’);
});
This code extends the previous example to handle different request paths (/) and send appropriate responses.
4. Streams API
(https://www.scaler.com/topics/nodejs/streams-in-nodejs/)
Node.js’s Streams API can greatly enhance your ability to manage data effectively in your applications, ultimately empowering you to create systems that are both scalable and high-performing.
What are Streams?
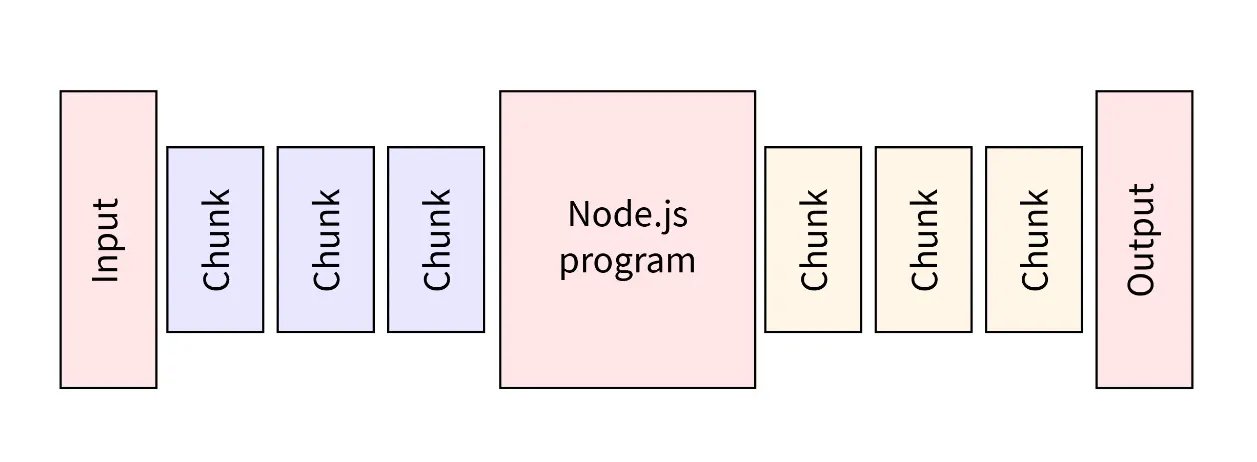
Imagine data flowing like a stream of water — that’s essentially the concept.
In the world of programming, think of streams as these cool, ongoing flows of data bits that keep coming in over time. With Node.js, you’ve got this whole assortment of stream types, each designed to handle different tasks like a pro:
- Readable Streams: Send out manageable portions of information for easy use, perfect for browsing through files, online connections, or whatever users input.
- Writable Streams: Enable the seamless writing of data portions, ideal for effortlessly saving files, sharing across networks, or storing in databases.
- Duplex Streams: The ability to read and write, perfect for seamless back-and-forth communication, just like how sockets or pipes work!
- Transform Streams: Modify data as it flows through, enabling encryption, compression, or data manipulation.
Why should you use Streams?
Streams shine in scenarios where large datasets or continuous data flows are involved. They offer several advantages:
- Memory efficiency: They handle data in chunks, avoiding loading the entire dataset into memory at once.
- Non-blocking nature: They don’t block the main thread, allowing your application to remain responsive while processing data.
- Flexibility: Different stream types cater to various data handling needs.
Getting Started with Streams
Exploring the built-in fs module provides a practical introduction to streams. Here’s an example reading a file chunk by chunk:
const fs = require('fs');
const readableStream = fs.createReadStream(‘large_file.txt’);
readableStream.on(‘data’, (chunk) => {
console.log(‘Received data chunk:’, chunk.toString());
});
readableStream.on(‘end’, () => {
console.log(‘Finished reading file’);
});
This code reads the large_file.txt file in chunks and logs them to the console. Explore the Node.js documentation for more types and their usage.
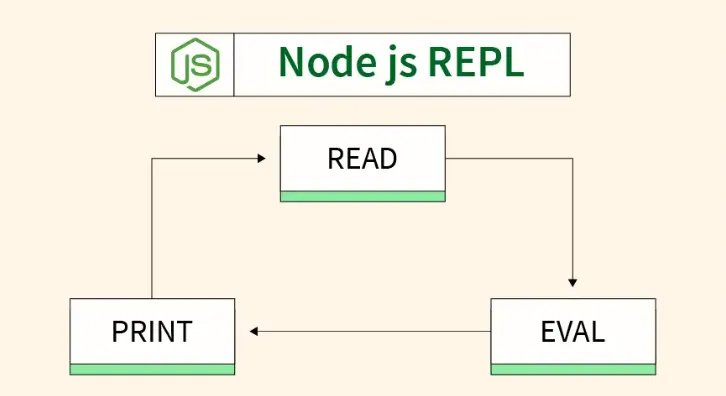
5. REPL (Read-Eval-Print Loop)
(https://www.scaler.com/topics/nodejs/node-js-repl/)
While worker threads and the cluster module contribute to improved performance and scalability, the dynamic duo of HTTP/2 and streams extends their abilities, offering versatile benefits across multiple domains. On a different front, the REPL (Read-Eval-Print Loop) introduces a distinct kind of power — interactivity and exploration.
Imagine a sandbox environment where you can experiment with code snippets, test ideas, and get immediate feedback — that’s the essence of REPL.
Think of it as a conversational coding experience. You type in code expressions, and the REPL evaluates them and displays the results, allowing you to iterate and learn quickly. This makes REPL invaluable for:
- Learning and Experimentation: Try out new JavaScript features, explore libraries, and test hypotheses in a safe, isolated environment.
- Debugging and Troubleshooting: Isolate and fix issues in your code line by line, inspecting variables and values at each step.
- Interactive Development: Prototype ideas quickly, get immediate feedback, and refine your code iteratively.
Accessing the REPL:
Open your terminal and simply type node. Voilà! You’re now in the REPL, ready to play. Type any JavaScript variable assignment, a function call, or even a complex calculation.
Welcome to Node.js v20.11.0.

Type ".help" for more information.

> Math.random()

0.6148448277159013
When compared to all the robust features outlined earlier, the REPL may seem deceptively simple. However, its true value becomes evident only through hands-on experience. As a Node.js developer, embracing and integrating the REPL into your workflow is not just beneficial but essential.
Node.js comes equipped with an array of handy features: worker threads handle those heavy-duty CPU tasks, the cluster module lets you easily scale out your applications, and http2 brings the efficiency of HTTP/2 to your network operations. Plus, streams make handling data a breeze, and the REPL is there for interactive learning and exploration.
By mastering these features, you’ll unlock the full potential of Node.js and build performant, scalable, and enjoyable development experiences.